.png)

Campaign Add & Campaign Info Settings
- Print
Campaign Add & Campaign Info Settings
- Print
Article summary
Did you find this summary helpful?
Thank you for your feedback!
Overview
This is where you register a campaign in the Studio app and configure the information needed before it starts. The flow consists of three steps — Campaign List → Add Campaign → Campaign Detail Management — and this article walks through the buttons and input fields on each screen in order.
1. Campaign List
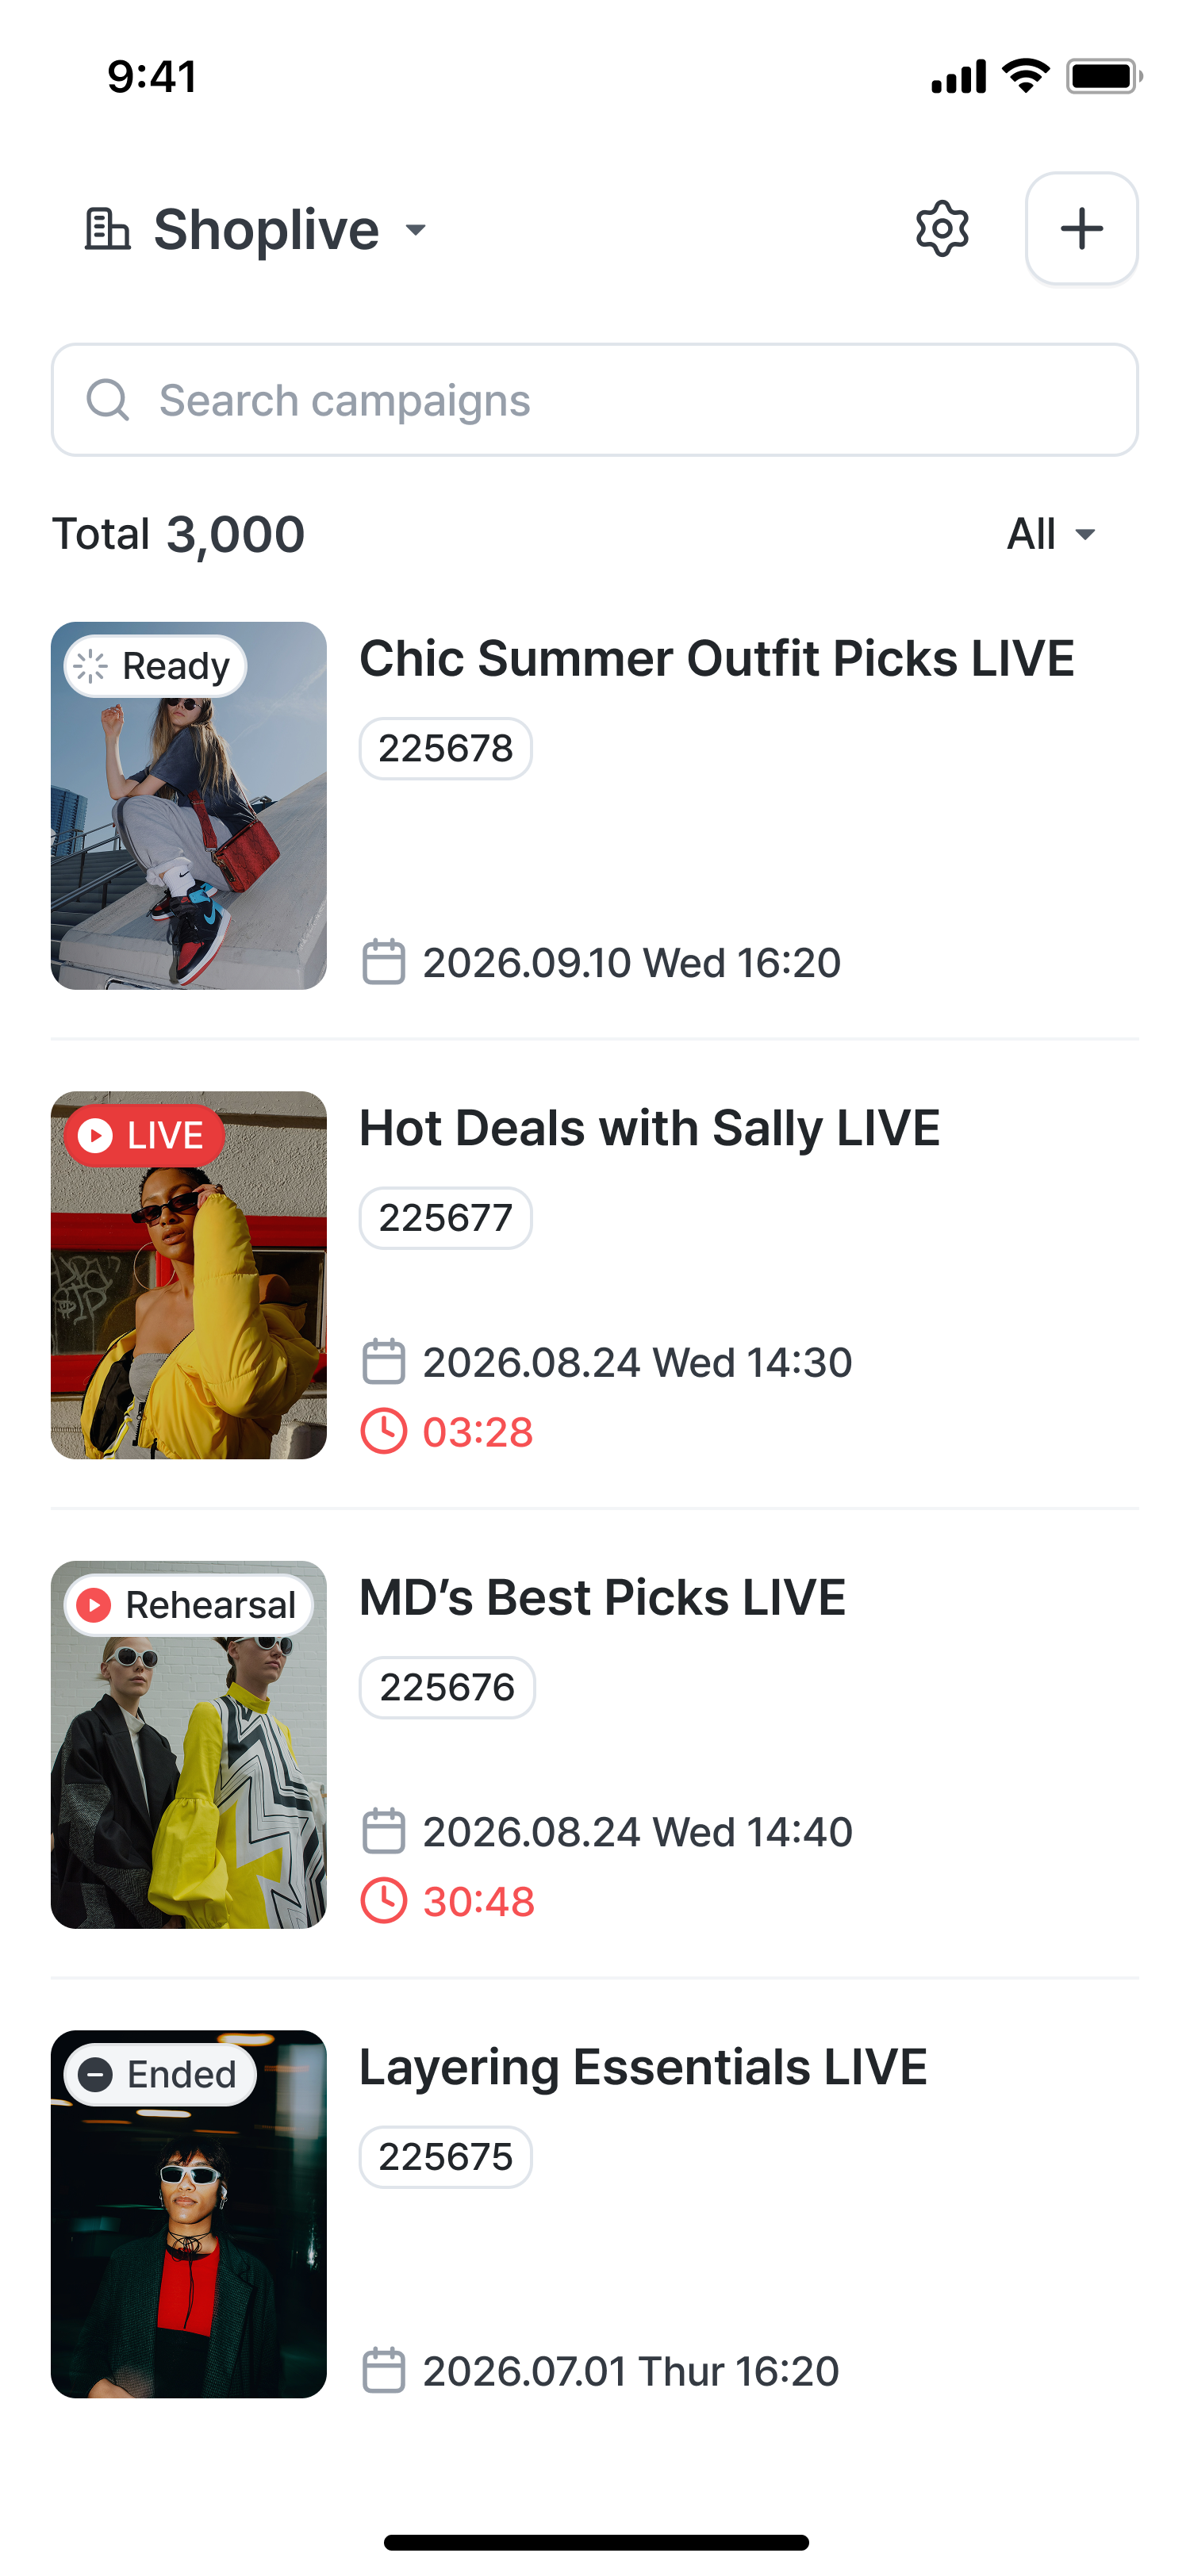
The Campaign List lets you see every registered campaign at a glance, add a new campaign, or open an existing campaign's detail settings.
Element | Description |
|---|---|
Account selector (e.g., Weekend Seoul) | The account you're currently viewing. If you manage multiple accounts, switch between them using the dropdown. |
⚙ Settings icon | Takes you to account settings. |
+ button | Opens the Add Campaign screen to register a new campaign. |
Search field (Search campaigns) | Filters the campaign list by title keyword. |
Total {nn} | The number of campaigns matching the current filter. |
All ▾ | Filters by status (All / Preparing / LIVE / Ended). |
Campaign Card Layout
Element | Description |
|---|---|
Thumbnail | The campaign's teaser image, or a default image if none is set. |
Status badge | See the table below. |
Title | The campaign title. |
Campaign ID | The campaign's unique identifier. |
Scheduled start | The scheduled date and time, shown with a calendar icon. |
Elapsed time (LIVE / Rehearsal only) | Counts up in red once the campaign or rehearsal has started. |
Status Badges
Badge | Meaning |
|---|---|
Preparing | Registered, but the campaign hasn't started yet. |
LIVE | Currently streaming in real time. |
Ended | The campaign has finished. |
Rehearsal | In rehearsal mode, before the actual campaign goes out to the public. |
Tapping a campaign card opens the Campaign Detail Management screen.
2. Add Campaign
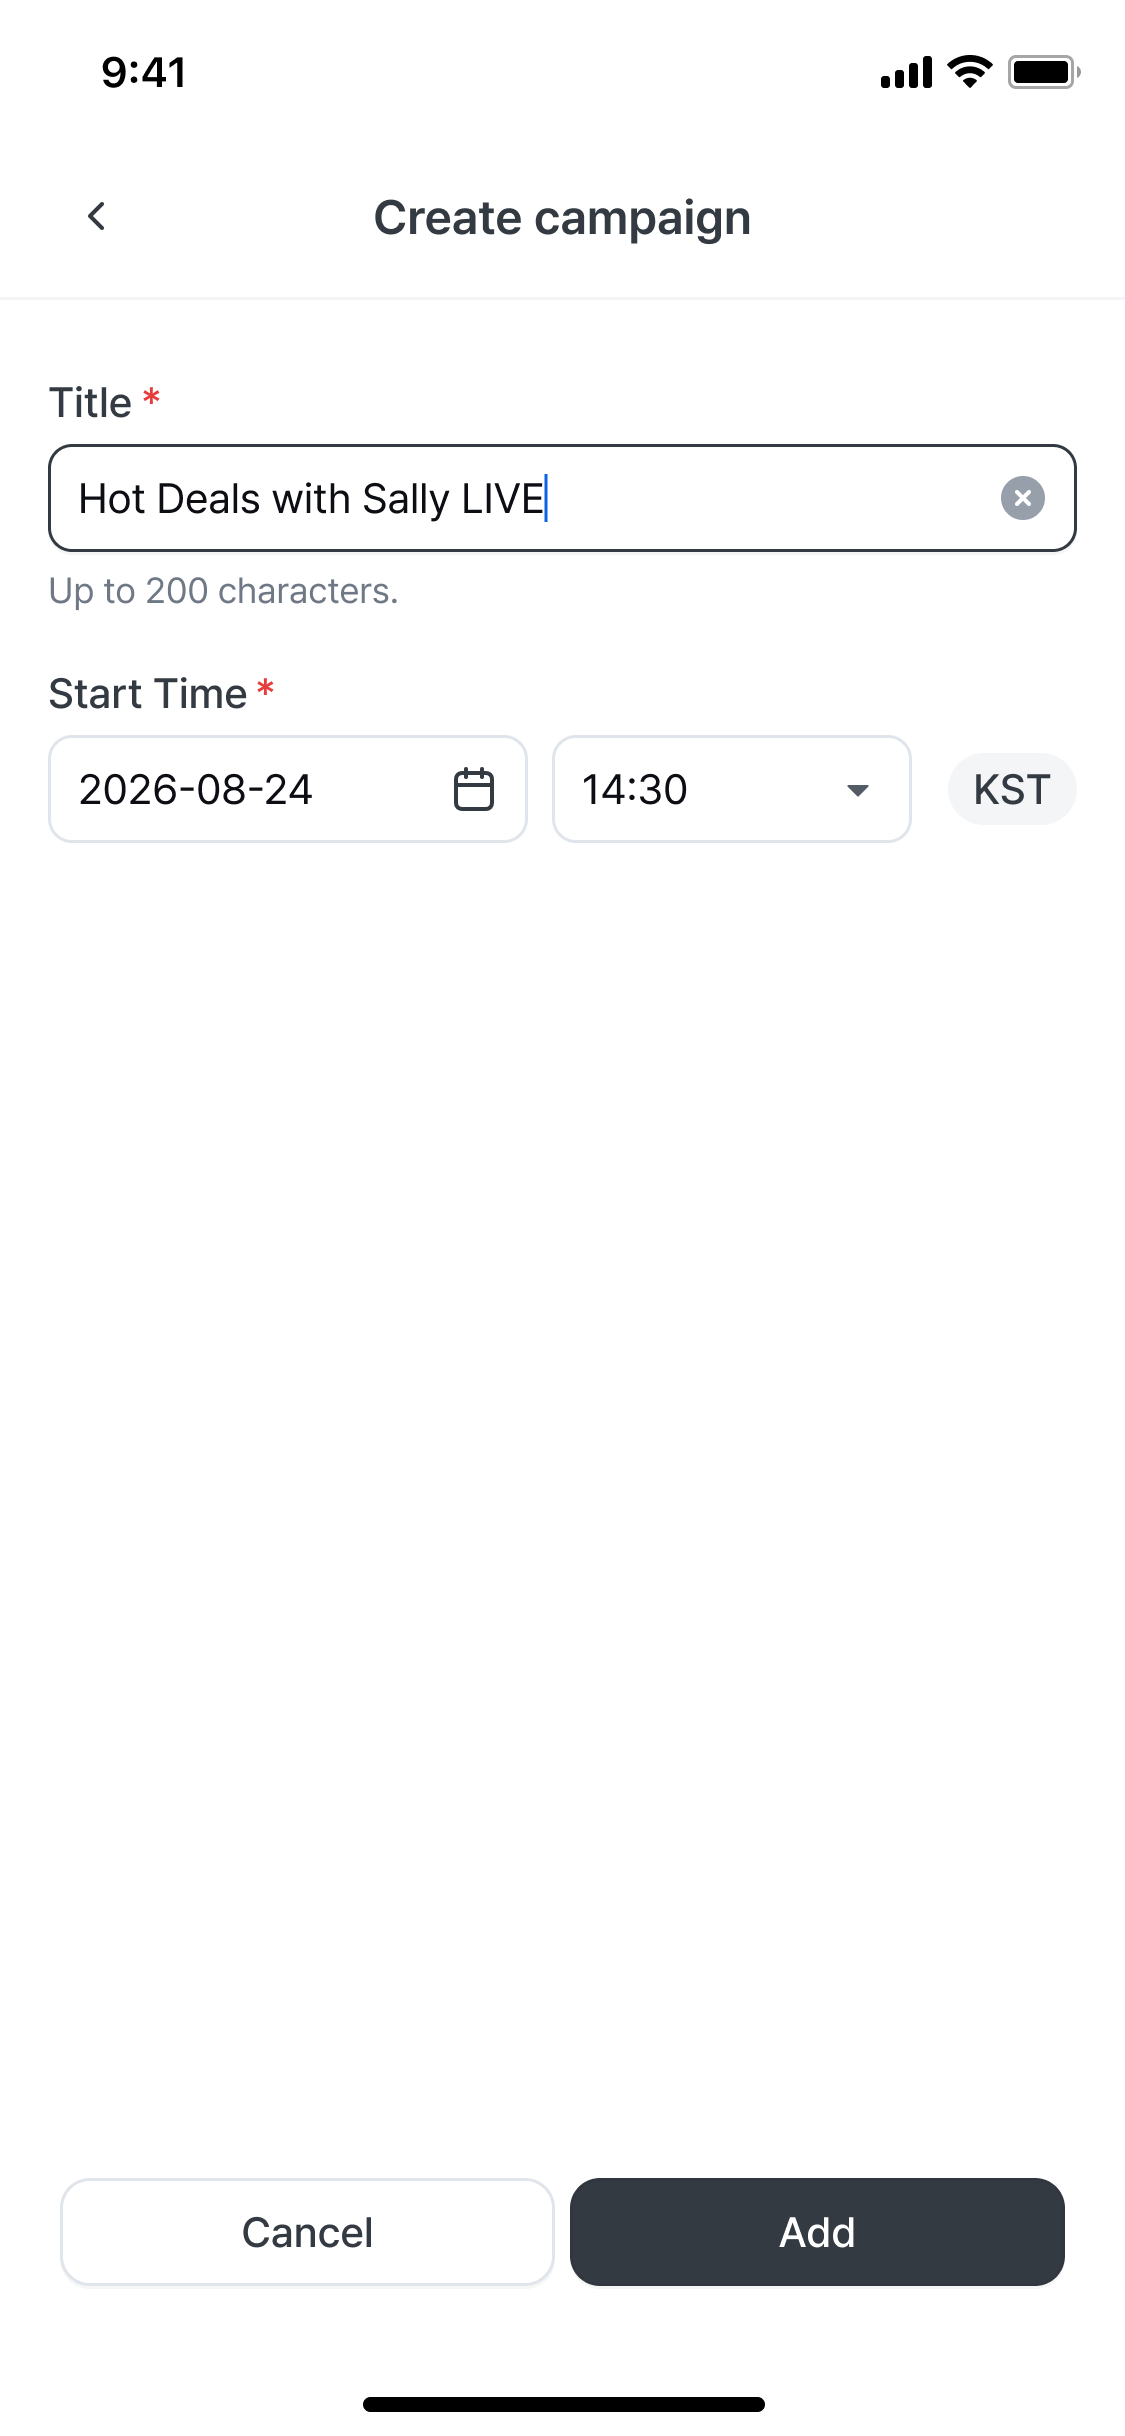
Opened by tapping the + button on the Campaign List, this screen collects only the minimum information needed to create a campaign. Additional settings (description, tags, images, replay, and so on) are configured afterward in Campaign Detail Management.
Field | Required | Description |
|---|---|---|
Title | Required | Has a maximum character limit. Once entered, it can be cleared instantly with the X button inside the field. |
Scheduled start | Required | Shows the date, time, and time zone together. |
Bottom Buttons
Button | Action |
|---|---|
Cancel | Closes the screen without saving anything you entered. |
Add | Creates the campaign with the entered information and lists it with a Preparing status. |
3. Campaign Detail Management
.png)
This screen lets you review and edit a campaign's details after it has been created. Tap Save at the top of the screen to apply any changes.
3-1. Campaign Info
A few fields are shown by default. Tapping Expand reveals the remaining values needed for integration.
Fields shown by default
Field | Description |
|---|---|
Campaign ID | The campaign's unique identifier. Tap the copy icon to copy it instantly. |
Preview URL | A player link that lets you preview the campaign screen even before it starts. |
Additional fields shown when expanded
Field | Description |
|---|---|
Campaign Key | A unique key value used for campaign integration. |
Stream URL | The server address to enter when connecting an external encoder (streaming hardware or software). |
Stream Key | An authentication key used together with the Stream URL. |
Rehearsal access code | A code shared with team members so they can join rehearsal mode without an actual campaign going out. |
3-2. Basic Settings
Field | Required | Description |
|---|---|---|
Title | Required | You can also edit here the title you entered when adding the campaign. |
Scheduled start | Required | Edit the date, time, and time zone. |
Description | Optional | Additional description of the campaign. |
Tags | Optional | Add tags with the Add + button; up to 10 tags can be set. |
3-3. Media Settings
Field | Description |
|---|---|
Campaign teaser image | The image shown on the waiting screen before the campaign starts. Tapping the X on an uploaded image removes it and reverts to the default image. |
3-4. Replay Settings
Field | Description |
|---|---|
Public toggle | Sets whether the replay video is made public to viewers after the campaign ends. |
As noted at the bottom of the screen ("More settings are available in the PC Admin"), the mobile Studio app provides only the core settings, while detailed options are managed in the PC Admin.
3-5. Bottom Action Buttons
Button | Action |
|---|---|
Enter Admin Mode | Goes to management features such as chat and products. (Covered in a separate guide) |
Enter Studio | Goes to the actual streaming screen (Streaming Mode). (Covered in a separate guide) |
Next guide: Streaming Mode → Admin Mode, in that order.